Panorama180 Render : Quick Start Guide
Developer : ft-lab (Yutaka Yoshisaka).
03/04/2019 - 03/01/2022.
This document used the google/DeepL translation.
Introduction
"Panorama180 Render" is an Editor extended Asset which renders rendering in Unity Editor in real time to 180 degrees panorama (Equirectangular) considering stereoscopic viewing and outputs it as a still image or a video.
This output is suitable for VR180.
However, processing of VR180 metadata for still images/video is not supported.
Panorama 360 output is now supported (ver. 2.0.0-).
Creating a RenderTexture for Panorama 180/360 is also available at runtime (build and run) (ver. 2.0.0-).
Panorama 180/360 monocular rendering is supported (ver.2.0.1-).
Here, the image of Equirectangular 180 degrees seen from the left and right eyes considering parallax is expressed as "Panorama 180-3D".
Here, the term "Panorama 360-3D" is used to describe an Equirectangular 360-degree image in all directions as seen by the left and right eyes, taking into account parallax.
Operating environment
Unity Editor 2018.4.x/2019.3.x-2019.4.x/2020.3.x/2021.2.x (Windows/Mac OS/Ubuntu)
Since Panorama180 Render renders stereoscopic panoramas, it combines renderings from 5+5 cameras in the case of Panorama180-3D.
In the case of Panorama 360-3D, renderings from 6+6 cameras are combined.
Because the GPU is used in the calculation, it becomes low speed when GPU performance is low.
I checked the operation in the following environment.
Unity : Unity 2018.4.6 / 2019.3.7 / 2019.3.12 / 2019.4.16 / 2019.4.28 / 2020.3.6 / 2021.2.1
GPU : NVIDIA GeForce RTX3060-12GB / RTX A5000-24GB
The following versions are supported. This is the environment in which I have tested it.
- Built-in : Unity 2018.4.6 - 2021.2.1
- HDRP(preview) : Unity 2018.4
- LWRP(preview) : Unity 2018.4
- URP : Unity 2019.3-2019.4 / 2020.3 / 2021.2.1
- HDRP : Unity 2019.3-2019.4 / 2020.3 / 2021.2.1
Built-in is a conventional pipeline that is not LWRP/HDRP/URP.
It can be used with Post Processing v2.
When URP/HDRP is used, Post Processing specification of Volume is supported.
It supports runtime (build and run) (ver. 2.0.0 - ).
VR (PC-VR with Oculus Quest2+Oculus Link/Confirmed by native execution on real machine) is supported in Unity 2019.4.4 or later (ver. 2.0.0 - ).
Please refer to the operational verification document (OperationalVerification.pdf) for the detailed verification environment.
Post Processing is optional. It works even if you don't use it.
Features
The behavior within the Unity Editor is described as "Editor", when building and running as "Runtime", and when in VR as "Runtime (VR)".
Runtime works by incorporating Panorama180 Render functionality into applications created in Unity.
- Editor/Runtime : Panorama 180-3D renders in real time from the set camera view
- Editor/Runtime : Expression like VR180 camera, Or panorama 180-3D rendering considering parallax when turning left and right
- Editor : 180 degrees panoramas in both still image and video can be set as background images (Equirectangular 360/Equirectangular 180/FishEye 180)
- Editor/Runtime : Post Processing (v2) effects can be assigned
- Editor : Panorama 180-3D output resolutions from 1024 x 512 to 16384 x 16384 pixels for both still images (jpeg/png) and video (mp4/mov/webm)
- Runtime : Create a RenderTexture for Panorama 180-3D/ Panorama 360-3D
- Editor : Video output also records audio
- Editor : Serial number output of jpeg or png file when outputting video
- Editor/Runtime : HDRP supported (Unity 2018.4 / 2019.3-2019.4 / 2020.3)
- Editor/Runtime : LWRP supported(Unity 2018.4) (ver.1.0.2 -/ver.1.1.1 -)
- Editor/Runtime : URP supported (Unity 2019.3-2019.4 / 2020.3) (ver.1.1.0 -)
- Editor/Runtime : Create and output Depth texture of panorama 180-3D of still image (ver.1.0.2 -)
- Editor/Runtime : Add API to output still image panorama 180-3D/360-3D (ver.1.0.2 -)
- Editor/Runtime : The camera reflects the X/Z axis rotation in addition to the Y axis rotation (ver.1.1.0 -)
- Editor/Runtime : Create and output Panorama 360 color/depth textures. (ver.2.0.0 -)
- Editor/Runtime : Create and output panoramic 180/360 monocular textures. (ver.2.0.1 -)
- Runtime : Runtime (build and run) support (ver.2.0.0 -)
- Runtime (VR) : Unity 2019.4.4 or later supports native execution on PC-VR/Oculus Quest2
Folder structure
The folder included with the Asset is organized as follows.
[Assets]
  [Panorama180Render]
	[Demo]                 For demo
	  [Images]             Image files
	  [Materials]          Matrials
	  [Objects]            Shapes
	  [Scenes]             Scenes for demo
	    [Editor]           Demo scene running in the Unity Editor
	    [Runtime]          Demo scene running in Runtime
	[Documents]            Documents (pdf)

	[Panorama180Render]    Files required for Panorama180 Render
From ver. 1.1.0 to ver. 2.0.0, the folder location of demo scene files and Shader files has been changed.
By using the files in the [Panorama180Render] folder,
You can use the function of Panorama180 Render in your project.
If the demo scene or documents is not required the "Demo" "Documents" folder can be deleted.
In each of the Built-in/URP/HDRP environments in Unity 2018/2019/2020, the sample scenes in the demo have differences in specifying materials, scene volumes, etc.
The samples are stored in the "Demo" folder.
The scripts and shaders are the same for Built-in/URP/HDRP.
Double-click each of the following files to overwrite the elements in the "Demo" folder by version.
- Panorama180Render_Demo_Unity2019_BuiltIn.unitypackage : Unity 2019 Built-in
- Panorama180Render_Demo_Unity2019_URP.unitypackage : Unity 2019 URP
- Panorama180Render_Demo_Unity2019_HDRP.unitypackage : Unity 2019 HDRP
- Panorama180Render_Demo_Unity2020_BuiltIn.unitypackage : Unity 2020 Built-in
- Panorama180Render_Demo_Unity2020_URP.unitypackage : Unity 2020 URP
- Panorama180Render_Demo_Unity2020_HDRP.unitypackage : Unity 2020 HDRP
Quick Start Guide
The simplest way to use the asset is as follows.
When creating a new scene, first check the location of the Main Camera.
When outputting as a still image
When outputting as a video
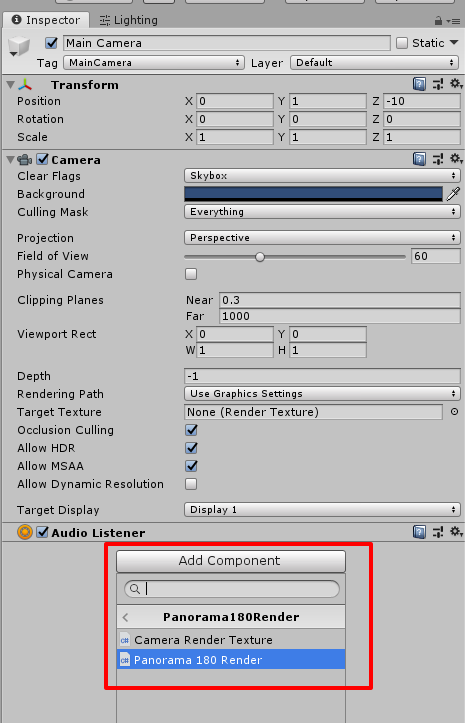
- Open the Inspector for the Main Camera, go to "Add Component" and choose Scripts/Panorama180Render, then add "Panorama180 Render".
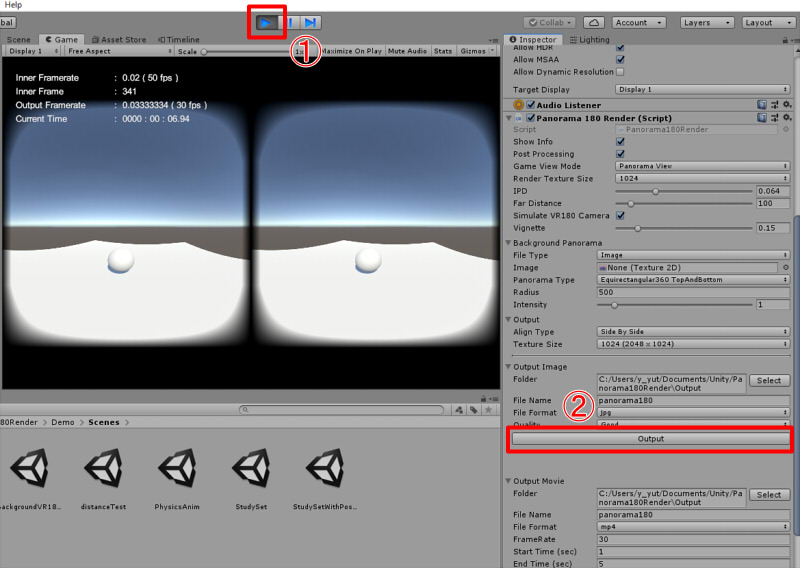
- In the Main Camera Inspector, click "Panorama 180 Render"-"Output Video"-"Output Video".
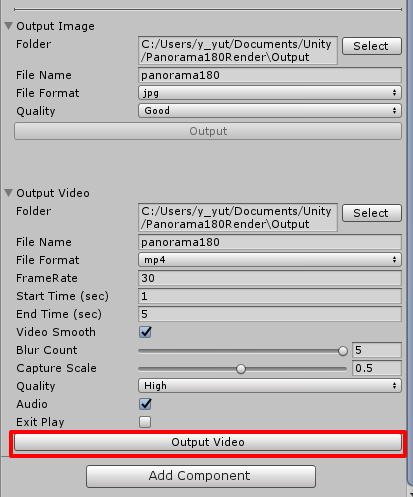
Please press "Output Video" button without executing Play.
As Shader is compiled the first time, depending on the environment it takes time to panorama display.
- Play mode automatically takes place and runs in the Game view, so when it reaches 100%, stop play.
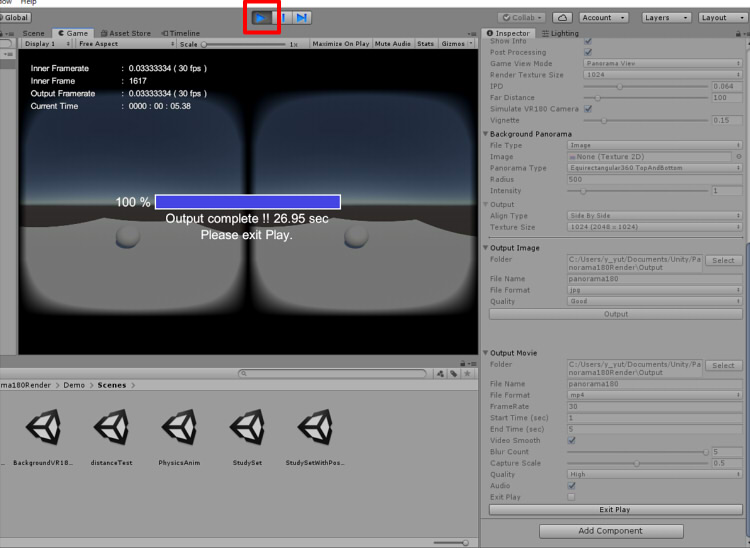
4 seconds of Panorama 180-3D video will be saved in the "Project Name/Output" folder as "panorama180.mp4".
About demo scenes
The following are the demo scenes.
It is divided into two parts: one that is designed to run on the Unity Editor, and one that is designed to be built and run as a Runtime.
The demo scene is created with a built-in pipeline.
Apply "unitypackage" to update the demo scene according to the Unity version or Built-in/URP/HDRP, it will update the related files.
Please refer to the "
Migrating the Unity Environment" section.
Editor
In the "Demo/Scenes/Editor" folder, you will find demo scenes that runs in the Unity Editor.
| Demo Scene Name |
Description |
| StudySet |
Scenes with desks and accessories arranged. |
| StudySetWithPostProcessing |
Scenes with desks and accessories arranged.
Using Post Processing.
In order to execute this scene it is necessary to install "Post Processing" from Package Manager.
|
| distanceTest |
A scene for checking the parallax between the front direction and the left and right direction.
It is for checking the parameter "Simulate VR180 Camera".
|
| BackgroundVR180Test |
Scene in which the 3D shapes was synthesized by placing the photo taken with the VR180 camera as the background.
|
| PhysicsAnim |
Animation scene.
It is for checking video output.
|
distanceDepthTest
(ver.1.0.2 -) |
A scene for checking the parallax between the front direction and the left and right direction.
For Depth texture output.
|
APITest
(ver.1.0.2 -) |
Use a script to move the camera and output panoramic still images and depth images continuously.
Attach the script "Demo/Scripts/MultipleCapture.cs" to the camera and use it.
|
Runtime
The "Demo/Scenes/Runtime" folder contains demo scenes that run in Runtime, which you build and run.
This will be a sample showing the steps to incorporate the Panorama180 Render in a Unity app.
For a description of the demo for this runtime, see "
Demos for Runtime".
| Demo Scene Name |
Description |
| blocks |
Runs on PC, not intended to be run in VR.
When executed, a panoramic expanded RenderTexture will be displayed in the upper right corner.
This demo shows how to capture panorama 180-3D and panorama 360-3D by switching between them.
|
| blocks_assignRenderTexture |
Works with PC, confirmed to work with PC-VR.
Building and running for Oculus Quest2 natively is not practical due to its heavy operation.
When executed, it will display a Panorama 360-3D RenderTexture on a block in the scene.
|
| blocks_sync_RenderTexture |
Works with PC, confirmed to work with PC-VR.
This can be built natively for Oculus Quest2.
When executed, pressing the [C] button on the keyboard or [X] button on the gamepad will display a Panorama 180 3D color RenderTexture and Depth RenderTexture on a block in the scene.
|
| blocks_sync_RenderTextureSave |
Works with PC, confirmed to work with PC-VR.
Not tested on Oculus Quest2 native.
When executed, pressing the [C] button on the keyboard or [X] button on the gamepad will display a Panorama 180 3D color RenderTexture and Depth RenderTexture on a block in the scene.
In addition, save the captured panorama image to a file.
|
Running on Ubuntu