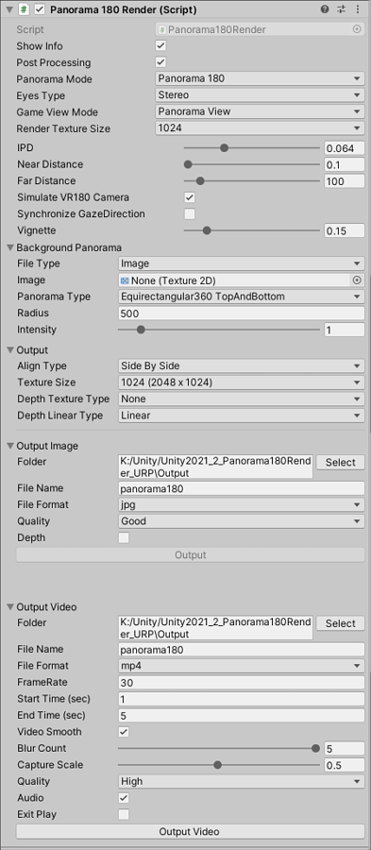
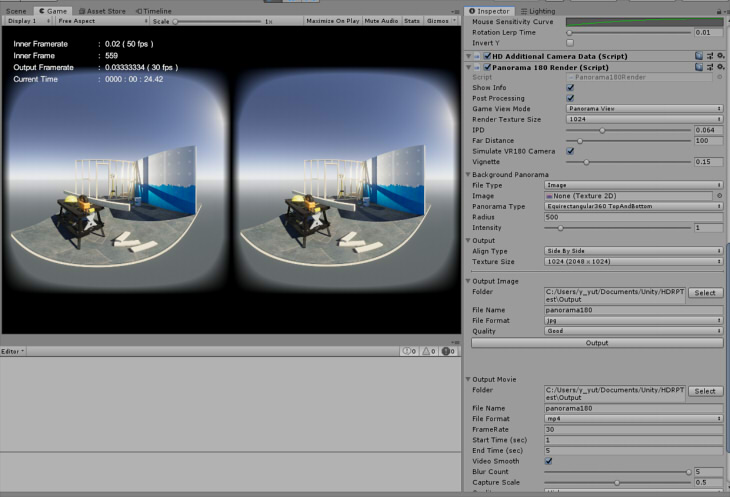
All specifications are done with "Panorama 180 Render" component of Camera Inspector.
Here, the image of Equirectangular 180 degrees seen from the left and right eyes considering parallax is expressed as "Panorama 180-3D".
Here, the image of Equirectangular 360 degrees seen from the left and right eyes considering parallax is expressed as "Panorama 360-3D".
The parameters that can be specified change depending on the selection of "Panorama Mode" (Panorama 180/Panorama 360).
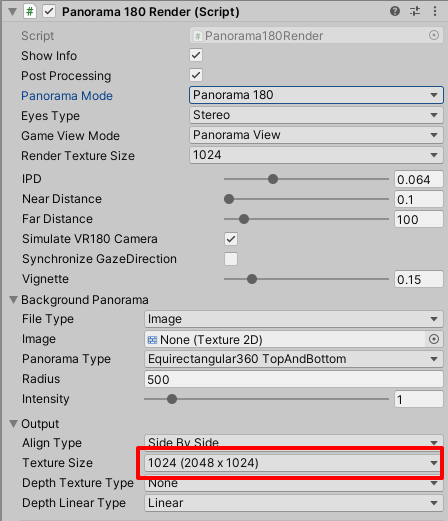
In the case of Panorama 180, the UI looks like the following.
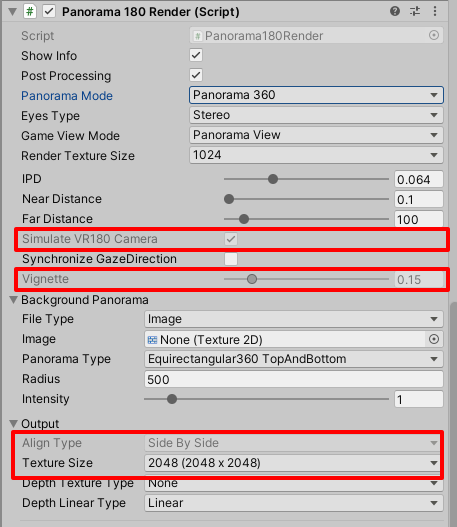
In the case of Panorama 360, the UI looks like the following.
The "Output"-"Texture Size" specification is different for Panorama 180/Panorama 360.
Also, the "Simulate VR180 Camera", "Vignette", and "Output"-"Align Type" settings are disabled.
| Parameter name | Description |
|---|---|
| Show Info | When playing, the frame rate, current frame number, elapsed time are displayed on the upper left of Game View. |
| Post Processing |
If Post Processing (v2) is assigned to the camera, it will also be reflected in the rendering result. If you are using HDRP in Unity 2018.3 or later, this parameter will not work. |
| Panorama Mode (ver.2.0.0 -) |
Selecting "Panorama 180" will generate a Panorama 180-3D image. Selecting "Panorama 360" will generate a Panorama 360-3D image. |
| Eyes Type (ver.2.0.1 -) |
When "Mono" is selected, a monocular image will be generated. When "Stereo" is selected, a stereo image will be generated. When "Mono" is selected, the IPD is treated as zero. The parallax will be zero, and the panorama will be rendered from the center of the camera. |
| Game View Mode |
When "Panorama View" is selected, display the Game view as Panorama 180-3D. When "Default" is selected, display of Game view is displayed from MainCamera. When set to "Default", Panorama180 Render will not be processed. The output rendering will be a Panorama 180-3D or 360-3D. Note that when you build and run Runtime, it is always treated as "Default". |
| Render Texture Size |
For Panorama 180-3D rendering, use 5 faces (-X/+X/-Y/+Y/+Z) of the cube map. For Panorama 360-3D rendering, use 6 faces (-X/+X/-Y/+Y/-Z/+Z) of the cube map. Specify the texture size of each cube map at this time. Select 512/1024/2048/4096/8192. In the case of Panorama 360-3D, the size of this texture is varied, so it will not be the same texture size. |
| IPD |
Specify the distance between left eye and right eye as Interpupillary Distance (IPD) (unit: meters). When "Mono" is selected for "Eyes Type", the IPD setting is disabled. In this case, the panorama will be rendered as zero parallax. |
| Near Distance (ver.1.0.2 -) |
Specifies the distance to the near clip plane of the camera for internal calculations (unit: meters). When outputting a Depth texture, it is used when correcting between 0.0 and 1.0. |
| Far Distance |
Specify the distance to be considered as the background for internal calculation (unit: meters). When "Simulate VR180 Camera" is Off, Specify the distance to be recognized as the background when stitching the cube map. This value should be smaller than "Radius" of "Background Panorama". |
| Simulate VR180 Camera |
When On, renders like a VR180 camera consisting of two fish eyes. Rendering will be equirectangular, not fisheye. Rendering like a VR180 camera will eliminate parallax when facing left and right. Therefore, the subject looks larger as it faces left or right. When this parameter is set to Off, it reflects parallax when facing left and right. If "Panorama Mode" is set to "Panorama 360", this setting is disabled. When using "Panorama 360", parallax is always taken into account. |
| Synchronize Gaze Direction (ver.1.1.0 -) |
Controls the rotation of the camera when generating panoramic image. If it is off, only Y-axis rotation is allowed. If it is on, XZ axis rotation is also allowed in addition to Y axis rotation. |
| Vignette |
For each left/right, specify the strength of the Vignette effect that makes the surroundings darker. If "Panorama Mode" is set to "Panorama 360", this setting is disabled. |
Background Panorama
Specify the background panorama image or video.
Does not work during Runtime.
Does not work during Runtime.
| Parameter name | Description |
|---|---|
| File Type |
Select either Image or Video. Note that the Audio of Video Clip when Video is specified is not reflected when outputting video. |
| Image |
When File Type is "Image", specify Texture of the still image. Depending on the environment, it may not be displayed correctly when "Generate Mip Maps" is On in the Import Settings of the background panorama texture. In that case, please make "Generate Mip Maps" Off. |
| Video |
When the File Type is "Video", specify the Video Clip of the video. |
| Loop |
When the File Type is "Video", the video is repeatedly played. |
| Speed |
When File Type is "Video", specify the playback speed. |
| Panorama Type |
Specify the projection type. "Equirectangular 360 TopAndBottom" is a 360 degree panorama of the left/right eye placed up/down. "Equirectangular 180 SideBySide" is a left/right 180 degree panorama of left/right eye arranged. "FishEye 180 SideBySide" is a left/right 180 degree fisheye placed left/right. |
| Radius |
The background is projected onto a sphere. Specify the radius of the sphere at this time (unit: meters). This radius must be sufficiently larger than "Far Distance". |
| Intensity |
Specify the brightness of the background color. |
Output
It is a parameter when outputting.
| Parameter name | Description |
|---|---|
| Align Type |
Select the type to place the panorama seen from the left and right. For "Top And Bottom", place it above and below. For "Side By Side", place it on the left and right. If "Panorama Mode" is set to "Panorama 360", this setting is disabled. When using "Panorama 360", the image is always treated as "Top And Bottom". |
| Texture Size |
Specify the size of the image when outputting. The selection will change depending on the "Panorama Mode". "Panorama 180" 512/1024/2048/3072/4096 is the same as the size of each image on the left and right. The selection of "Aligin Type" is arranged up and down or right and left. For 4K / 5.7K / 8K / 16K, Side By Side fixed position is set. If this size is large, if you do not enlarge "Render Texture Size" as a cube map, it will be stretched overall and become rough. "Panorama 360" When using Panorama 360-3D, the left and right panoramas are always placed in a "Top And Bottom" orientation. The output panorama image will be square. The following options are available. 512(512x512) / 1024(1024x1024) / 2048(2048x2048) / 3072(3072x3072) / 4096(4096x4096) / 4K(3840x3840) / 5.7K(5760x57640) / 8K(7680x7680) / 16K(15360x15360) / 16384(16384x16384). When "Mono" is selected for "Eyes Type", only the image on one side will be reflected. |
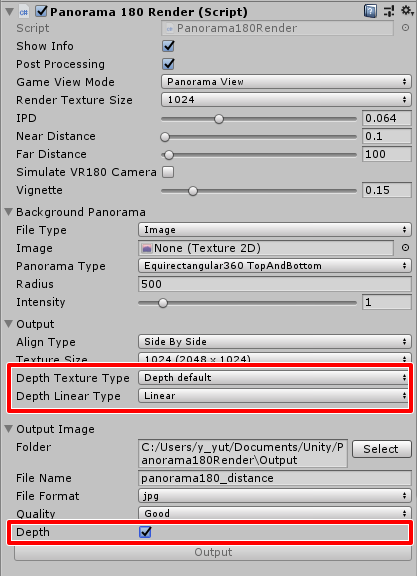
| Depth Texture Type (ver.1.0.2 -) |
Select the type of panorama depth texture output. "None" does not output the depth texture. "Depth default" outputs the Depth texture in the same size as the panorama image. "Depth one half resolution" outputs the Depth texture in 1/2 size of panorama image. "Depth one quarter resolution" outputs the Depth texture in 1/4 size of the panorama image. |
| Depth Linear Type (ver.1.0.2 -) |
Select the type of interpolation when outputting the panorama depth texture. "Linear" linearly interpolates the Z distance in view coordinates to 0.0-1.0 and stores it. "Non-Linear" non-linearly interpolates Z distance in view coordinates to 0.0-1.0 and stores it. The parameters of "Near Distance" and "Far Distance" are used in the interpolation calculation of Depth. |
Output Image
It is a parameter when outputting as a still image.
This is a feature in the Unity Editor of Panorama180 Render, so it cannot be used during Runtime.
This is a feature in the Unity Editor of Panorama180 Render, so it cannot be used during Runtime.
| Parameter name | Description |
|---|---|
| Folder |
Specify the output destination folder. Text in folder display can not be edited. When "Select" button is pushed, a dialog box for selecting the output folder is displayed. |
| File Name |
Specify the output file name. No extension is specified here. |
| File Format |
Specify the type of output file. You can select jpg/png. |
| Quality |
Specify the quality when outputting as Jpeg. Quality is Superb 100%, Good 75%, Normal 50%, Average 25%, Bad 10%. |
| Depth (ver.1.0.2 -) |
When "Output"-"Depth Texture Type" is other than "None", in addition to the output of panorama image, the Depth texture is output in exr format. |
| Output |
By pressing this push button, the rendered still image is output to the specified folder. |
Output Video
It is a parameter when capturing and outputting as a video.
This is a feature in the Unity Editor of Panorama180 Render, so it cannot be used during Runtime.
This is a feature in the Unity Editor of Panorama180 Render, so it cannot be used during Runtime.
| Parameter name | Description |
|---|---|
| Folder |
Specify the output destination folder. Text in folder display can not be edited. When "Select" button is pushed, a dialog box for selecting the output folder is displayed. |
| File Name |
Specify the output file name. No extension is specified here. In case of jpg/png serial number output, "_ 000000" and frame number are added after the file name. |
| File Format |
Specify the type of output video file. Select from mp4(H.264), webm(VP8), mov(H.264), jpg, png. Hardware processed mp4 is the fastest output speed. If jpg/png is specified, it will be output to the designated folder as a sequential file in one frame. For Ubuntu (Linux), the mp4 format is not available. |
| FrameRate |
Specify the number of frames to output per second. |
| Start Time (sec) |
Specify the capture start time in seconds. Some of the first frames are in preparation and may be dark. In that case, please try to capture with some time waiting. |
| End Time (sec) |
Specify the capture end time in seconds. |
| Video Smooth |
Simple frame interpolation is done and it shows smoothly. This will simply combine the current frame from past frames. |
| Blur Count |
When "Video Smooth" is set to On, specify the number of past frames to be referenced (maximum 5). |
| Capture Scale |
Adjust the sampling time interval when capturing. Increasing this value will shorten the capture time, but if you use the Video Clip in the scene it may not be synchronized and it may turn black. Also, it may not be smooth in case of a heavy scene requiring rendering time. Lowering this value will increase the capture time, but you can capture the scene more accurately. |
| Quality |
Specify the quality of the video. Select from Low/Medium/High. |
| Audio |
Set "On" to add Audio to video. Please be sure to arrange the Audio Source in the audio of the scene. Audio in Video Clip is not reflected when capturing. |
| Exit Play |
When the capture processing is completed, Play is automatically stopped. |
| Output Video |
When you press the "Output Video" button, capture starts with the parameters specified as video. |
Information displayed during Play
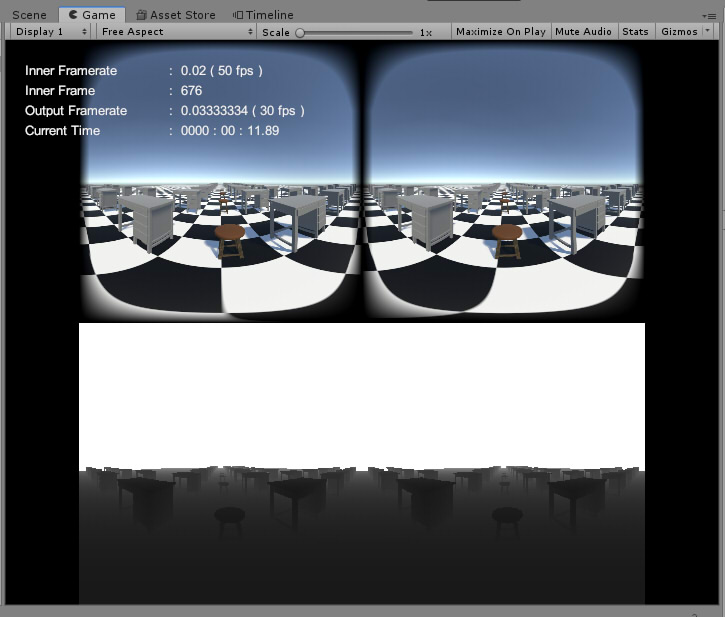
When the "Show Info" checkbox of the "Panorama 180 Render" component is set to On, the number of elapsed frames and elapsed time are displayed at the upper left of the Game view.
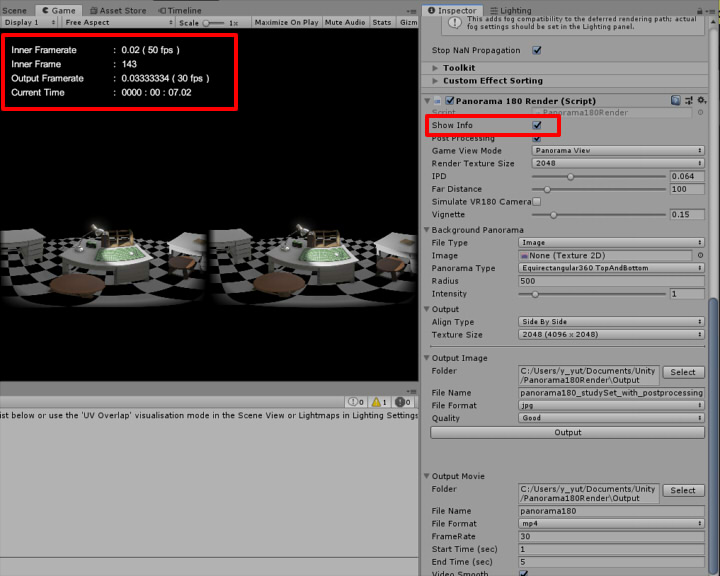
"Inner Framerate" is an internal execution time (seconds) of one frame during Play.
When outputting video, it will be the same value as "Output Framerate".
"Inner Frame" is the number of frames that have passed.
"Output Framerate" is the execution time (seconds) of one frame as a video file when outputting a video.
This value is not referenced when video output is not done.
Current Time is the elapsed time since Play started.
In the case of Play, it is the same as the actual elapsed time.
When outputting video, it will be the elapsed time in the video to be output.
Panorama Mode (ver.2.0.0 - )
If "Panorama Mode" is set to "Panorama 180", a Panorama 180-3D image will be generated.
If "Panorama Mode" is set to "Panorama 360", a Panorama 360-3D image will be generated.
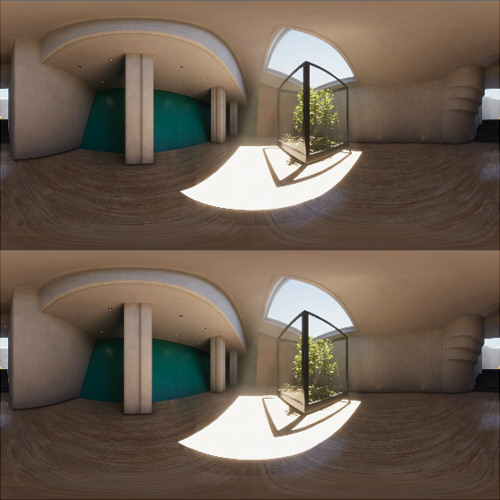
In the case of "Panorama 360", the placement is always "Top And Bottom".
The image is corrected (stitched) so that the boundary is not broken as much as possible.
On the top and bottom, the inconsistency when viewing stereoscopic images becomes larger, and there will be areas where the boundaries are difficult to connect well.
If "Panorama Mode" is set to "Panorama 360", a Panorama 360-3D image will be generated.
In the case of "Panorama 360", the placement is always "Top And Bottom".
The image is corrected (stitched) so that the boundary is not broken as much as possible.
On the top and bottom, the inconsistency when viewing stereoscopic images becomes larger, and there will be areas where the boundaries are difficult to connect well.
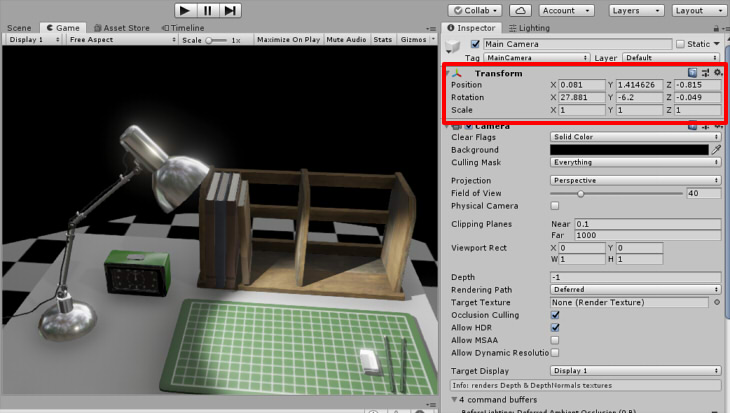
Orientation of camera at Play
The camera at Play always points perpendicular to the Y axis.
The camera rotates around the Y axis and does not rotate the XZ axis.
If "Synchronize Gaze Direction" is turned on, the camera's XZ axis will also be allowed to rotate (ver.1.1.0-).
Also, when the camera moves, rendering of panorama 180-3D will follow it as well.
Below is the position and rotation of the camera before Play.
Below is the position and rotation of the camera during Play.
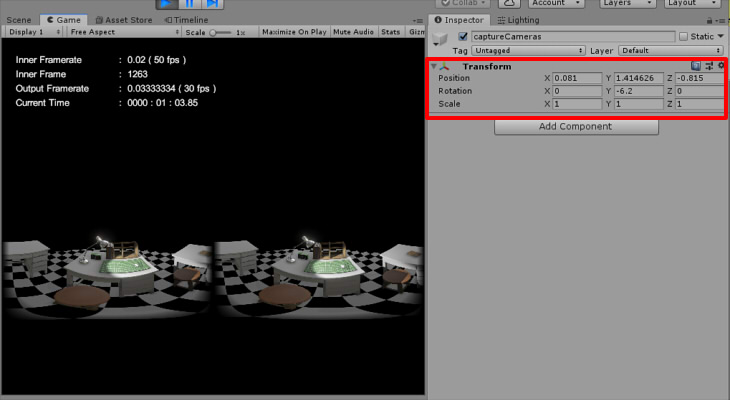
When "Synchronize Gaze Direction" is off, the X and Z of the rotation will be zero.
When "Synchronize Gaze Direction" is set to On, the rotation of XYZ axis is reflected.

The camera rotates around the Y axis and does not rotate the XZ axis.
If "Synchronize Gaze Direction" is turned on, the camera's XZ axis will also be allowed to rotate (ver.1.1.0-).
Also, when the camera moves, rendering of panorama 180-3D will follow it as well.
Below is the position and rotation of the camera before Play.
Below is the position and rotation of the camera during Play.
When "Synchronize Gaze Direction" is off, the X and Z of the rotation will be zero.
When "Synchronize Gaze Direction" is set to On, the rotation of XYZ axis is reflected.
Elements to place in the scene during Play
When playing, GameObject "Panorama 180 Render" is generated.
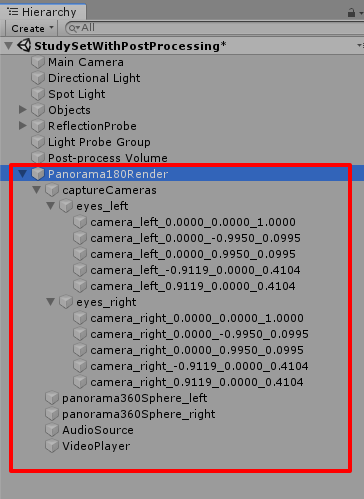
Camera that projects each face of panorama 180-3D cube map is placed in "captureCameras" in this.
In total it will be 5+5 cameras.
If Post Processing is assigned, it also assigns to the cameras in "captureCameras".
The left and right renderings from this cameras will be integrated into one panorama.
If background panorama is specified, the shape of the "panorama360Sphere_left" "panorama360Sphere_right" spheres is placed.
For this spheres, a background panorama of 180 degrees is projected.
If you specify a video in the background panorama, a video will be assigned to "VideoPlayer".
"AudioSource" will reflect the audio at that time (not used in Panorama 180 Render ver.1.0.0).
Resolution for VR
The output for VR-HMD looks beautiful with one eye with 2048 pixels or more (Overall 4 K resolution).
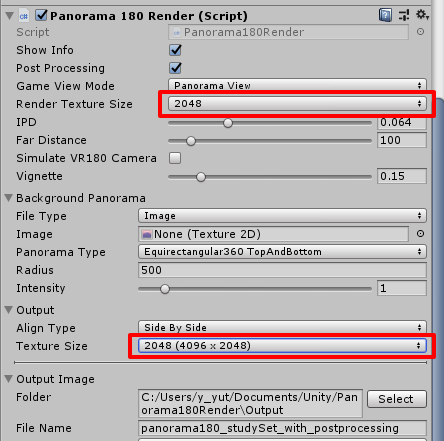
To output a panorama image viewed with VR-HMD,
specify "2048" or more with "Render Texture Size" and "2048 (4096 x 2048)" or more with "Output" - "Texture Size".
If "Output" - "Texture Size" specifies "5.7 K" or less,
"Render Texture Size" will be the size of one face as cube map, so "2048" seems to make it.
Incidentally, when increasing the resolution, The rendering time of one frame increases.
Specify the "Render Texture Size"
The "Render Texture Size" parameter specifies the resolution of a single face as a cubemap when rendering a panorama.
Select from 512/1024/2048/4096/8192.
The larger the resolution, the more memory is used by the GPU and the longer it takes to render.
For 4096/8192, a higher performance GPU is required.
As a rule of thumb, four times the width of the "Render Texture Size" (horizontally around the camera) will fit into the resolution of a monocular panorama.
If the "Render Texture Size" is 2048, then 2048*4=8192.

In this case, 8K resolution just fits in Panorama 360.
In the case of Panorama 180, 2048 * 3 = 6144 corresponds to the horizontal resolution of the panorama.
When outputting an 8192 x 4096 panoramic image as Side By Side in Panorama 180-3D, one eye is 4096 pixels.
Therefore, the panorama 180-3D Side By Side of 8192 x 4096 will fit even if the "Render Texture Size" is set to 2048.
Select from 512/1024/2048/4096/8192.
The larger the resolution, the more memory is used by the GPU and the longer it takes to render.
For 4096/8192, a higher performance GPU is required.
As a rule of thumb, four times the width of the "Render Texture Size" (horizontally around the camera) will fit into the resolution of a monocular panorama.
If the "Render Texture Size" is 2048, then 2048*4=8192.
In this case, 8K resolution just fits in Panorama 360.
In the case of Panorama 180, 2048 * 3 = 6144 corresponds to the horizontal resolution of the panorama.
When outputting an 8192 x 4096 panoramic image as Side By Side in Panorama 180-3D, one eye is 4096 pixels.
Therefore, the panorama 180-3D Side By Side of 8192 x 4096 will fit even if the "Render Texture Size" is set to 2048.
Using Post Processing
This process is not necessary when specifying "High-Definition RP" or "Lightweight RP" or "Universal RP" as a Template when creating a Unity project.
For HDRP / LWRP Template, "Post Processing" is included.
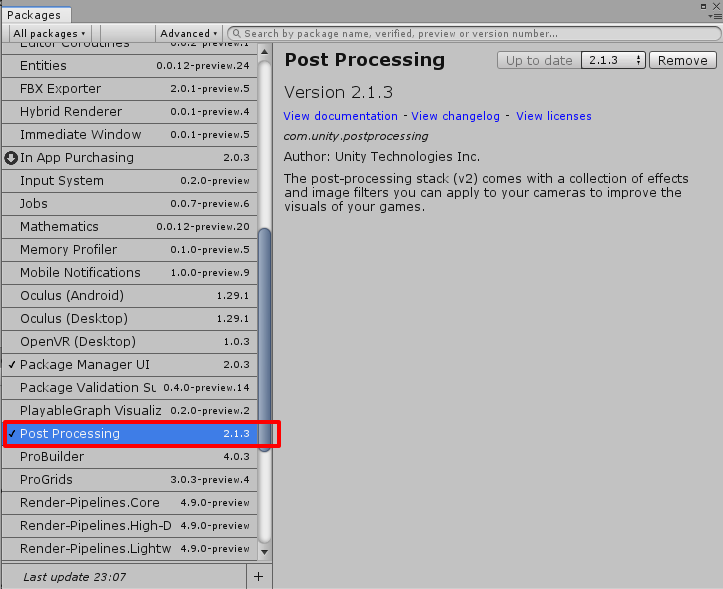
It becomes confirmation with Unity 2018.3.6 + Post Processing 2.1.3.
It's also confirmed in Unity 2019.3.7 + Post Processing 2.3.0.
Select "Window" - "Package Manager" in the main menu and select "Post Processing" from "Packages" to install in the project.
For details on how to use Post Processing, please refer to the document on Post Processing.
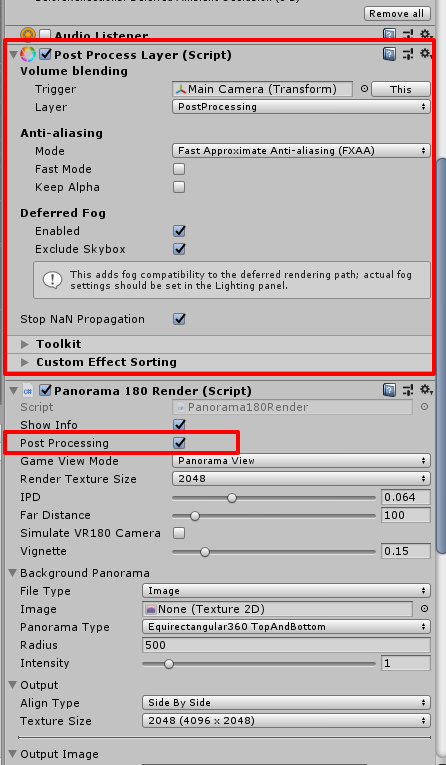
Add "Post Processing Layer" component to MainCamera and set Post Processing.
Add the "Panorama 180 Render" component and turn on the "Post Processing" check box.
This will take the Image Effect of Post Processing when the panoramic image is rendered.
This process takes a long processing time because it is done for 5 cube map textures (10 for both eyes) with one eye.
Panorama180 Render creates and synthesizes 5 cube map textures with one eye.
If the Ambient Occlusion or Bloom is strong at that time or the Vignette is used, the boundary will be visible.
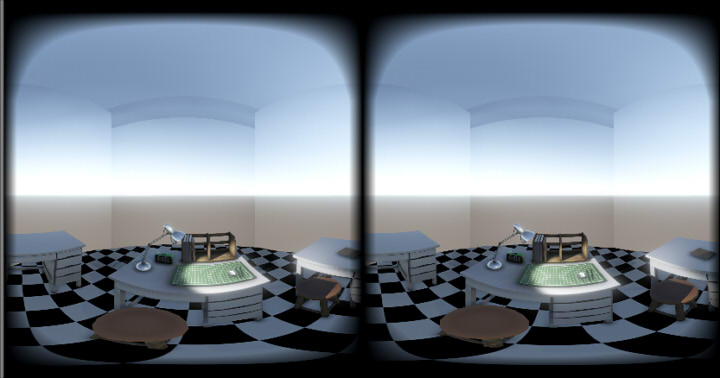
In this case, adjust Ambient Occlusion and Bloom in Post Processing weakly, and turn Vignette off.
It may be better to turn off Auto Exposure as well.
For Vignette, please use "Vignette" of "Panorama 180 Render".
For HDRP / LWRP Template, "Post Processing" is included.
It becomes confirmation with Unity 2018.3.6 + Post Processing 2.1.3.
It's also confirmed in Unity 2019.3.7 + Post Processing 2.3.0.
Select "Window" - "Package Manager" in the main menu and select "Post Processing" from "Packages" to install in the project.
For details on how to use Post Processing, please refer to the document on Post Processing.
Add "Post Processing Layer" component to MainCamera and set Post Processing.
Add the "Panorama 180 Render" component and turn on the "Post Processing" check box.
This will take the Image Effect of Post Processing when the panoramic image is rendered.
This process takes a long processing time because it is done for 5 cube map textures (10 for both eyes) with one eye.
Panorama180 Render creates and synthesizes 5 cube map textures with one eye.
If the Ambient Occlusion or Bloom is strong at that time or the Vignette is used, the boundary will be visible.
In this case, adjust Ambient Occlusion and Bloom in Post Processing weakly, and turn Vignette off.
It may be better to turn off Auto Exposure as well.
For Vignette, please use "Vignette" of "Panorama 180 Render".
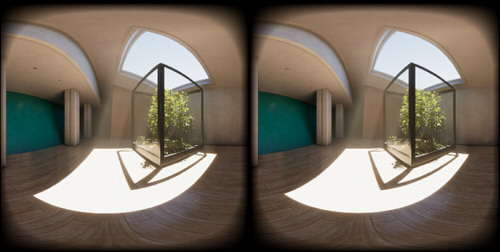
Simulate VR180 Camera
When "Simulate VR180 Camera" is turned on,
A rendering result with Equidangular rendering from two fisheye lenses like the VR180 camera can be obtained.
In this case, the parallax disappears as it goes to the left and right, and it approaches a state where stereoscopic view can not be done.
When it is turned off, rendering results with parallax in the case of facing left and right are taken into account.
When "Simulate VR180 Camera" is On, When expanding the cube map to Equirectangular, stitching that connects each cube map faces smoothly does not occur.
When Post Processing is done, processing to show it smoothly occurs.
When "Simulate VR180 Camera" is Off, Since different disparity information is mixed in one equirectangular, stitching occurs.
At this time, interpolation is performed so that it looks smooth.
This makes it difficult to see distortions and cuts at the boundary.
Designation of background panorama (Unity Editor)
Background panoramas specify image or video with two left and right elements as the background.
In the case of the still image VR180 format, convert it so that the two eyes panorama is displayed with "VR180 Creator" (https://vr.google.com/vr180/apps/) in advance.
* "VR180 Creator" is currently not available.
You can specify the following panorama expansion types.
It is not synchronized with camera movement and rotation.
You can specify the following panorama expansion types.
- "Equirectangular360 TopAndBottom"
The upper/lower 360 degree panorama (Equirectangular) of left/right eye is arranged.

As a background, the front 180 degrees range is used.
- "Equirectangular180 SideBySide"
The left/right 180 degree panorama (Equirectangular) of the left eye/right eye is arranged.
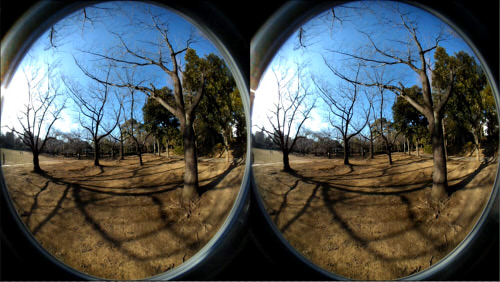
- "FishEye180 SideBySide"
The left eye/right eye has left eye/right eye 180 degrees fisheye placed.
It is not synchronized with camera movement and rotation.
When synthesizing 3D geometry with VR180 photo in the background panorama (Unity Editor)
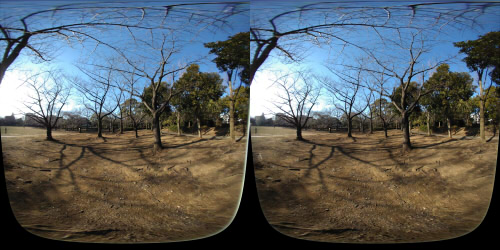
In the case of a VR180 camera made up of two fisheye lenses, please be aware that parallax will be lost when turning left and right.
When combining photo taken with the VR180 camera and 3D shapes to be placed in the scenes,
in Panorama180 Render, if you use "Simulate VR180 Camera" set to On, the background panorama photo and 3D shapes are more likely to match.
However, in this case, parallax will be eliminated when facing left and right.
When the resolution of the background panorama is low (Unity Editor)
Background Panorama image can be imported into Unity's project by specifying Texture or Video Clip.
Please check the Inspector of Texture/Video Clip when playing resolution is low.
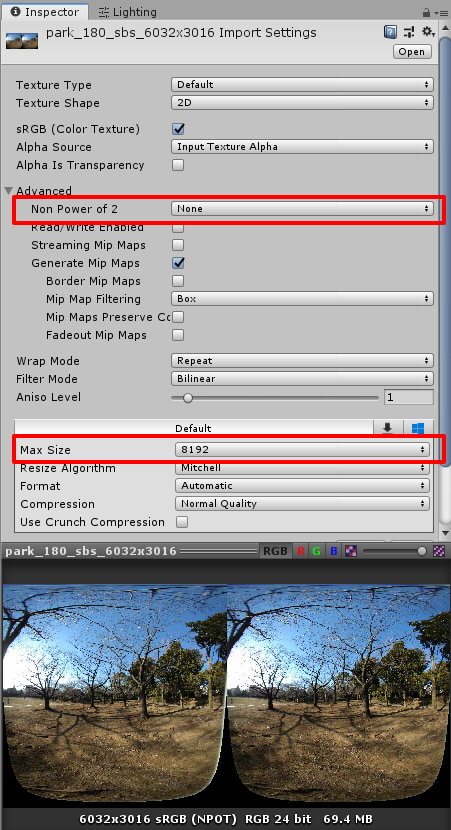
If the texture size is larger than 2048 (default), you can use it as a large texture on Unity by increasing "Max Size".
To import a texture that is not a power of 2 size, use the original size by setting "Advanced"-"Non Power of 2" to "None".
Please check the Inspector of Texture/Video Clip when playing resolution is low.
If the texture size is larger than 2048 (default), you can use it as a large texture on Unity by increasing "Max Size".
To import a texture that is not a power of 2 size, use the original size by setting "Advanced"-"Non Power of 2" to "None".
Still image output (Unity Editor)
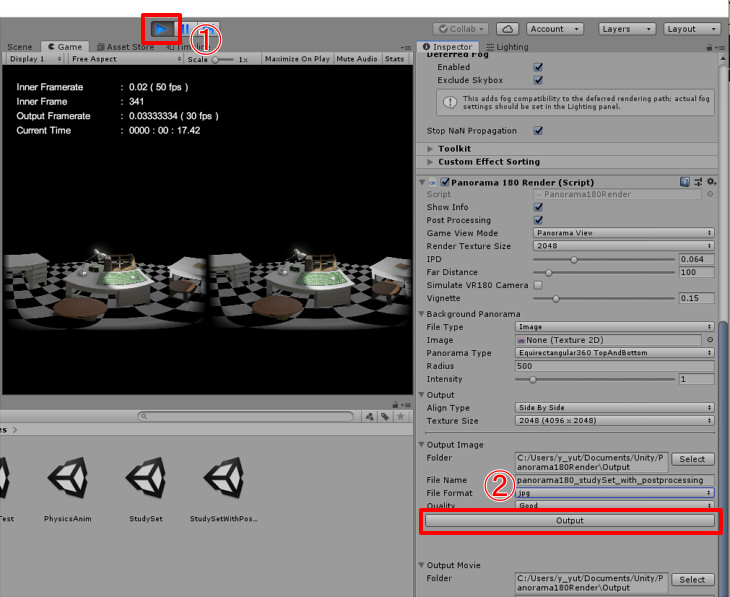
For still images of panorama 180-3D,
After executing Play, if you press "Output Image" - "Output" button with "Panorama 180 Render" component of Camera, it will be output to the specified "Folder/File Name".
Also, while playing, each parameter of Inspector can be changed.
When Play is stopped, it returns to the parameter before Play.
To change the folder, press "Select" button of "Folder" and specify it.
Initial value is output to "Project name path/Output".
In "File Name", enter a file name without specifying the extension.
For "File Format" specify jpg or png, for jpg use "Quality" to specify the quality of JPEG image.
Video output (Unity Editor)
Video output is started by pressing "Output Video" - "Output Video" button of "Panorama 180 Render" component assigned to Camera without playing.
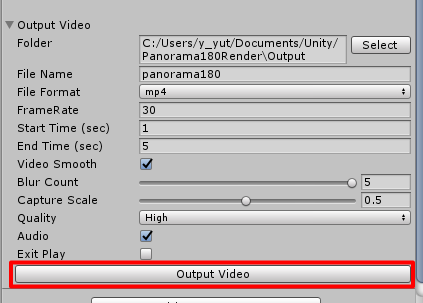
At this time, the progress bar is displayed in the Game view, and the animation of "Start Time" to "End Time" time is output with the specified folder/file name.
When the video output is completed, the output time and the end message are displayed.
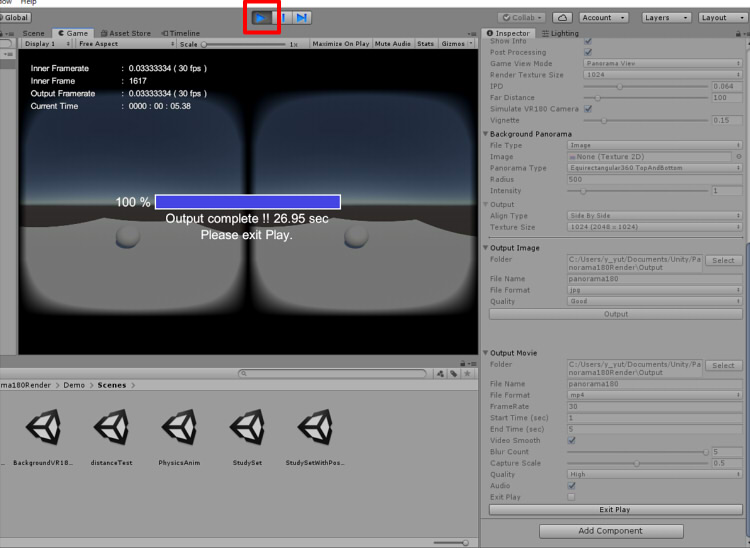
Please make sure to stop Play after this message is displayed.
Note that each parameter of Panorama 180 Render can not be changed while outputting video.
To change the folder, press "Select" button of "Folder" and specify it.
Initial value is output to "Project name path/Output".
In "File Name", enter a file name without specifying the extension.
"File Format" can specify mp4/webm/mov/jpg/png.
Of these, jpg/png outputs serial images of still images in the number of frames.
The output of mp4 is fast. webm output is slow.
In order to capture each frame when running on Unity, we slow down the overall playback speed (reduce timeScale) so that frames are not skipped.
When working with Video Clip as a scene element, the first few frames are often dark.
In this case, reduce the value of "Capture Scale".
Lowering this value will take more output time, but it will result in more accurate output.
To add Audio to video, set the "Audio" check box to On.
For Audio, the Audio Source placed in the scene is reflected.
Audio concerning Video Clip is not reflected.
When outputting the video stably, it automatically adjusts the timeScale adjustment of the scene and the playback speed of the Video Clip,
at that time the synchronization of Audio on the Video Clip side does not go well.
For Audio, please specify it with Audio Source.
At this time, the progress bar is displayed in the Game view, and the animation of "Start Time" to "End Time" time is output with the specified folder/file name.
When the video output is completed, the output time and the end message are displayed.
Please make sure to stop Play after this message is displayed.
Note that each parameter of Panorama 180 Render can not be changed while outputting video.
To change the folder, press "Select" button of "Folder" and specify it.
Initial value is output to "Project name path/Output".
In "File Name", enter a file name without specifying the extension.
"File Format" can specify mp4/webm/mov/jpg/png.
Of these, jpg/png outputs serial images of still images in the number of frames.
The output of mp4 is fast. webm output is slow.
In order to capture each frame when running on Unity, we slow down the overall playback speed (reduce timeScale) so that frames are not skipped.
When working with Video Clip as a scene element, the first few frames are often dark.
In this case, reduce the value of "Capture Scale".
Lowering this value will take more output time, but it will result in more accurate output.
To add Audio to video, set the "Audio" check box to On.
For Audio, the Audio Source placed in the scene is reflected.
Audio concerning Video Clip is not reflected.
When outputting the video stably, it automatically adjusts the timeScale adjustment of the scene and the playback speed of the Video Clip,
at that time the synchronization of Audio on the Video Clip side does not go well.
For Audio, please specify it with Audio Source.
Video (mp4/mov) Codec H.264 license
Panorama180 Render uses Unity's MediaEncoder to output videos.
In Unity 2018.3, the video codec used for mp4/mov is H.264.
Depending on how you use the output video when using H.264 you may need a license as an end user.
Please also refer to "AVC Patent Portfolio License" ( https://www.mpegla.com/programs/avc-h-264/license-agreement/ ).
In Unity 2018.3, the video codec used for mp4/mov is H.264.
Depending on how you use the output video when using H.264 you may need a license as an end user.
Please also refer to "AVC Patent Portfolio License" ( https://www.mpegla.com/programs/avc-h-264/license-agreement/ ).
Resolution at video output
When outputting video such as mp4 (H.264) and webm (VP8), playback time will be required when the size exceeds 4096 x 2048 pixels.
Mp4 (H.264) generally supports up to 4096 pixels, but you can specify a higher resolution.
However, depending on the playing player, the frame rate of playback may become unstable in case of high resolution.
In the case of webm (VP8), the load at playback may be higher than mp4 when high resolution (4K or more) is reached.
Panorama180 Render outputs videos via MediaEncoder used in Unity.
In Unity 2018.3, mp4 uses H.264 as the codec, and webm uses VP8 as the codec.
Both high-resolution movies are a burden, so if you are dealing with 4K resolution or higher,
you may want to convert to H.265 or VP9 using FFmpeg ( https://www.ffmpeg.org/ ) etc.
When uploading a video to YouTube, it seems that it is automatically converted to VP9 as of 2019.
Panorama180 Render Ver.2.0.2 supports 16K (15360, 16384) resolution panorama image/video output.
Unity seemed to support videos up to 15360 x 15360 pixels as webm (VP8).
Trying to output video with 16384 x 16384 resolution will result in an error.
Support for LWRP/HDRP/URP (ver.1.0.2 - )
"Panorama180 Render" ver.2.0.0 stage supports LWRP/HDRP/URP for Unity 2018.3-2019.4/2020.3/2021.2.
It works differently depending on the version.
The correspondence is as follows.
The "Panorama180 Render" Depth output does not work properly with Unity 2019.1+HDRP.
You can find the verification details for each version in the "Operational verification" section.
It works differently depending on the version.
The correspondence is as follows.
| Unity version | LWRP | HDRP | URP | Details |
|---|---|---|---|---|
| 2018.3 - 2018.4 | OK | OK | - | |
| 2019.1 - 2019.2 | OK | NG | - | |
| 2019.3 - 2019.4 | - | OK | OK | |
| 2020.3 | - | OK | OK | |
| 2021.2 | - | OK | OK |
You can find the verification details for each version in the "Operational verification" section.
Support for HDRP
Panorama180 Render supports HDRP (High-Definition RP) for SRP (Scriptable Render Pipeline), which is included in Unity 2018.1.
HDRP is the Preview version in Unity 2018.3-2018.4/Unity 2019.1-2019.2.
HDRP will be officially supported in Unity 2019.3.
For HDRP, specify HDRP in Template when creating a project, or install from "Package Manager".
Panorama180 Render generates 10 cubemap textures for Panorama180 3D and 12 cubemap textures for Panorama360 3D, and assigns Post Processing (Volume) to each of them. When using HDRP, it becomes very heavy.
Confirm Vignette and Exposure when using HDRP
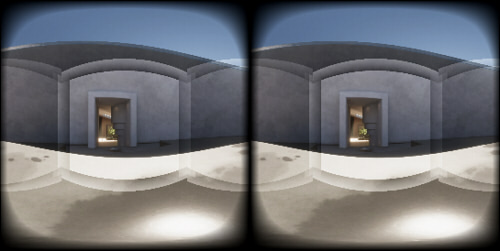
When HDRP is used, auto exposure is set by default. Also, Vignette is turned on by default.
In this case, using Panorama180 Render will not handle the boundaries correctly.

In this case, add Vignette and Exposure in HDRP Post Processing,
turn off Vignette and set Exposure Mode to Fixed.
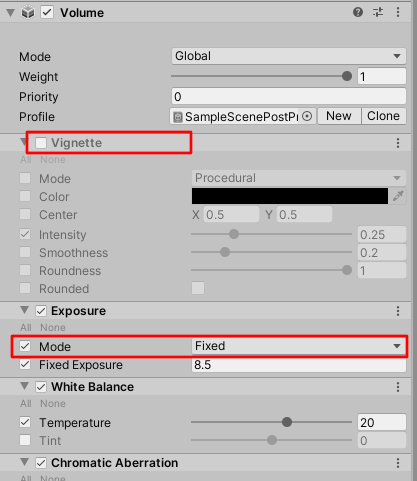
The boundaries are now correct, as shown below.

In the HDRP SampleScene in Unity 2020, multiple volumes are specified for a single scene.
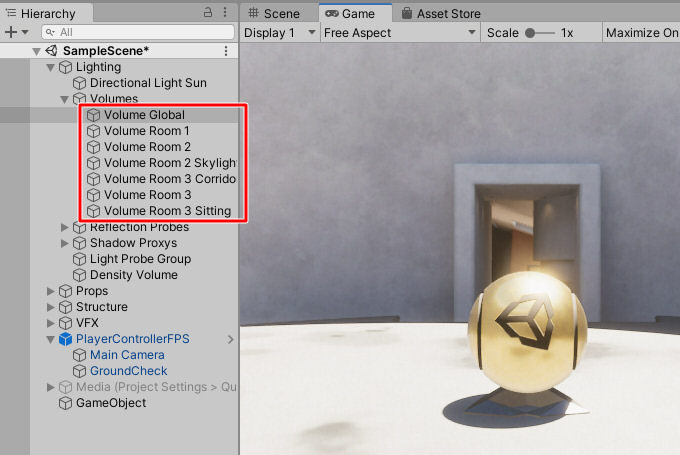
This will change the effect of Post Processing depending on the location.
When the Panorama180 Render is processed as it is, the border is noticeable as shown below.
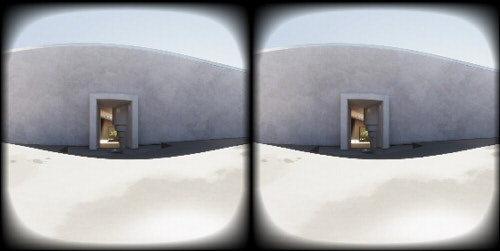
To alleviate this, you can set Exposure to Fixed for each volume, disable Vignette, and reduce the Intensity value in Bloom.
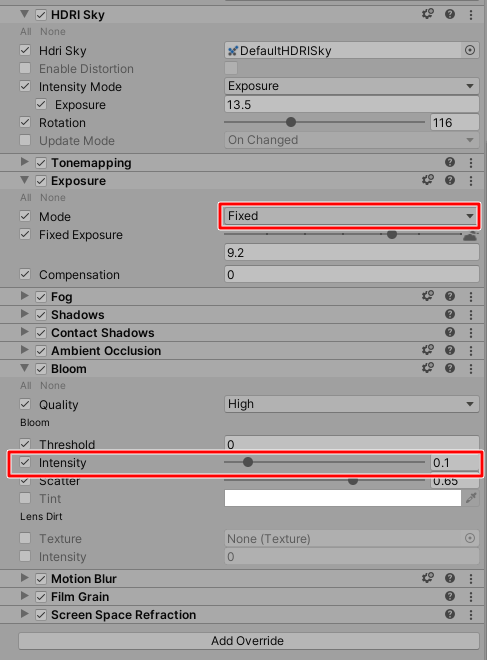
The result is as follows.
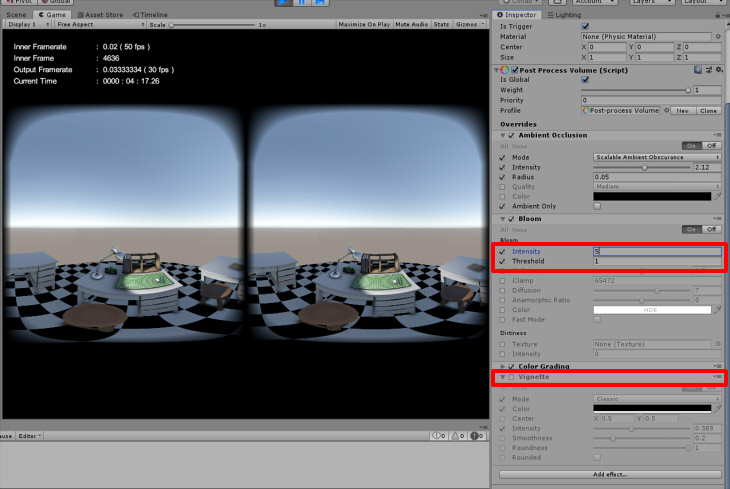
If Bloom is not present in the Post Prosessing volume specification, add it and set Intensity to 0.
By default, the Bloom effect is applied, so disable it.
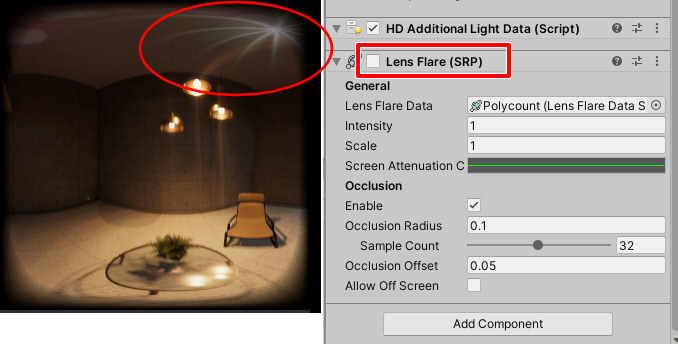
In addition, when using "Lens Flare" with "Directional Light", incorrect flares could also appear.
Lens Flare is an effect caused by the camera, so leave it off.
In this case, using Panorama180 Render will not handle the boundaries correctly.
In this case, add Vignette and Exposure in HDRP Post Processing,
turn off Vignette and set Exposure Mode to Fixed.
The boundaries are now correct, as shown below.
In the HDRP SampleScene in Unity 2020, multiple volumes are specified for a single scene.
This will change the effect of Post Processing depending on the location.
When the Panorama180 Render is processed as it is, the border is noticeable as shown below.
To alleviate this, you can set Exposure to Fixed for each volume, disable Vignette, and reduce the Intensity value in Bloom.
The result is as follows.
If Bloom is not present in the Post Prosessing volume specification, add it and set Intensity to 0.
By default, the Bloom effect is applied, so disable it.
In addition, when using "Lens Flare" with "Directional Light", incorrect flares could also appear.
Lens Flare is an effect caused by the camera, so leave it off.
Use as VR180
* "VR180 Creator" is currently not available.
Panorama180 Render performs panorama 180-3D output and does not assign metadata as VR180 format for still image or video.
For videos, you can attach metadata to mp4 files by using Google's "VR180 Creator"(https://vr.google.com/vr180/apps/).
Please refer to the document "VR180 Creator" for usage.
In the case of still images, there is no way to allocate metadata later with "VR180 Creator" (ver. 4.0) for the panorama 180-3D rendered image (a bin file containing metadata is required).
However, there is a way to view it with most VR-HMD that can display stereo panorama corresponding to 180 degrees.
In the case of Oculus Go, By loading the panorama 180-3D rendered image with "Gallery" and switching to "180 3D" you can see it in stereoscopic view.
Output Depth texture (ver.1.0.2 - )
When "Output"-"Depth Texture Type" is specified other than "None" and the "Output Image"-"Depth" check box is turned on, the depth texture is output as a file.
At this time, the Depth texture is displayed on the Game View at the time of Play.
In "Output"-"Depth Texture Type", select the same size as the panorama image, 1/2 size, 1/4 size.
When "Linear" is specified in "Output"-"Depth Linear Type", the depth value is converted to 0.0-1.0 linearly.
When "Non-Linear" is specified in "Output"-"Depth Linear Type", the depth value is converted to 0.0-1.0 nonlinearly.
The internal formula is as follows.
ZDistance is the Z distance in view coordinates.
NearDistance is the distance to the near clip plane of the camera specified by "Near Distance".
FarDistance is the distance to the far clip plane of the camera specified by "Far Distance".
Each pixel in the depth texture can be used to back calculate the Z distance in view coordinates from a 0.0-1.0 depth value.
When outputting a still image by pressing the "Output Image"-"Output" button,
a Depth texture is output in the EXR format as "xxxx_depth.exr" together with the output of a panorama image of "xxxx.jpg".
Note that it does not support Depth texture output in video.
At this time, the Depth texture is displayed on the Game View at the time of Play.
In "Output"-"Depth Texture Type", select the same size as the panorama image, 1/2 size, 1/4 size.
When "Linear" is specified in "Output"-"Depth Linear Type", the depth value is converted to 0.0-1.0 linearly.
When "Non-Linear" is specified in "Output"-"Depth Linear Type", the depth value is converted to 0.0-1.0 nonlinearly.
The internal formula is as follows.
When "Depth Linear Type" is "Linear"
depth = (ZDistance - NearDistance) / (FarDistance - NearDistance)
When "Depth Linear Type" is "Non-Linear"
depth = (ZDistance < FarDistance) ? ((ZDistance - NearDistance) / ZDistance) : 1.0
ZDistance is the Z distance in view coordinates.
NearDistance is the distance to the near clip plane of the camera specified by "Near Distance".
FarDistance is the distance to the far clip plane of the camera specified by "Far Distance".
Each pixel in the depth texture can be used to back calculate the Z distance in view coordinates from a 0.0-1.0 depth value.
When outputting a still image by pressing the "Output Image"-"Output" button,
a Depth texture is output in the EXR format as "xxxx_depth.exr" together with the output of a panorama image of "xxxx.jpg".
Note that it does not support Depth texture output in video.